CNet is a C++/CUDA framework for building and researching deep complex valued neural networks, as well as for optimization of complex valued functions using gradient descent with Wirtinger derivatives. In the current version it is relatively straightforward to implement new CPU-only functions / layers. In subsequent releases, support will be added to easily implement CUDA layers, too.
Why are complex valued neural networks (CVNN) interesting? For one, it is a research area that is currently neglected due to the huge commercial success of real valued ones. Complex numbers work very well for phasic data. The fields where these can be implemented most readily are: Signal Communications; Healthcare (both medical image and ECG); Deep Fake Detection; and Acoustic Analysis for Industrial Maintenance.
The current mainstream ML frameworks PyTorch and JAX offer support for complex differentiation, each having its own limitations. However, despite the fact that mathematically the field of complex numbers ℂ can be seen as a Clifford algebra, the reality is more nuanced. As W. Rudin noted: "in spite of the well-known and obvious identification of ℂ with ℝ², these two are entirely different as far as their vector space structure is concerned."
Table of Contents
Examples
A Simple Complex Neural Net for MNIST
The following code shows how to build a minimal neural net for the MNIST/Fashion MNIST datasets, using the Fourier Transform and Hadamard layers with a Gelu activation function:
CNet cnet;
auto inp = cnet.add(new CInput(OutSize(28 * 28)));
auto fft = cnet.add(new FourierTrans(InSize(28 * 28)), {inp});

auto h_data = cnet.add(new CInput(OutSize(28 * 28)));
auto hdm = cnet.add(new Hadamard(InSize(28 * 28), InSize(28 * 28)), {fft, h_data});

auto gelu = cnet.add(new CGelu(InSize(28 * 28)), {hdm});

auto l_data = cnet.add(new CInput(OutSize(28 * 28 * 10)));
auto lin = cnet.add(new Linear(InSize(28 * 28), InSize(28 * 28 * 10)), {gelu, l_data});
auto outp = cnet.add(new CrossEntropy(InSize(10)), {lin});
Adding Custom Complex Valued Functions / NN Layers
In order to add a new complex valued function, say
Sigmoid : ℂⁿ → ℂⁿ given by Sigmoid(z)ᵢ ↦ 1 / (1 + e−zᵢ),
all you need to do is extend the CFunc class and provide implementations for
forward() and backward().
class CSigmoid: public CFunc {

public:
  CSigmoid(InSize in_size) : CFunc(in_size, OutSize(in_size.value())) {
  }
};
Writing an implementation for forward() is usually straightforward:
virtual void forward() {
    for (int in_indx = 0; in_indx < input().length_; ++in_indx) {
        complex<float> g = 1.0f / (1.0f + exp(-input().z(in_indx)));
        mutable_output()->real_[in_indx] = g.real();
        mutable_output()->imag_[in_indx] = g.imag();
    }
}
Providing an implementation for backward() is in general more difficult.
The CNet framework makes things easier when you can compute the
Wirtinger derivatives
by implementing the dz() and dz_star() methods instead.
For the Sigmoid function, the conjugate derivatives are all null because Sigmoid is defined only in terms of z = x + iy and not of the conjugate z* = x − iy:
while the z derivatives are easily computed as:
virtual complex<float> dz(int out_indx, int in_indx) {
    if (out_indx != in_indx) {
        return 0;
    }
    auto g = 1.0f / (1.0f + exp(-input().z(in_indx)));
    return g * (1.0f - g);
}

virtual complex<float> dz_star(int out_indx, int in_indx) {
    return 0;
}
We can test the implementation by minimizing the Sigmoid using Wirtinger gradient descent:
CNet net;
auto inp = net.add(new CInput(OutSize(128)));
auto sigm = net.add(new CSigmoid(InSize(128)), {inp});
auto l2 = net.add(new L2Out(InSize(128)), {sigm});

net.init_inputs();
net.init_exec_graph(true);
for (int var = 0; var < 1000; ++var) {
    net.forward();
    cout << var << "\tLoss: " << ((L2Out*)net[l2])->loss() << endl;
    net.backward(0);
    net.updateInputs(0.1);
}
Running from the command line:
~/cnet -test_sigmoid trueone can observe that the loss is decreasing:
Depth 0: Input_1 3072,
Depth 1: CSigmoid_2 3072,
Depth 2: L2Out_3 3096,
0    Loss: 32.008
1    Loss: 28.512
2    Loss: 25.425
3    Loss: 22.725
4    Loss: 20.377
5    Loss: 18.341
...
798  Loss: 0.100
799  Loss: 0.099
...
Computation Graph on CUDA
In order to execute the forward and backward passes, the functional graph is ordered by depth, as shown in the diagram below:
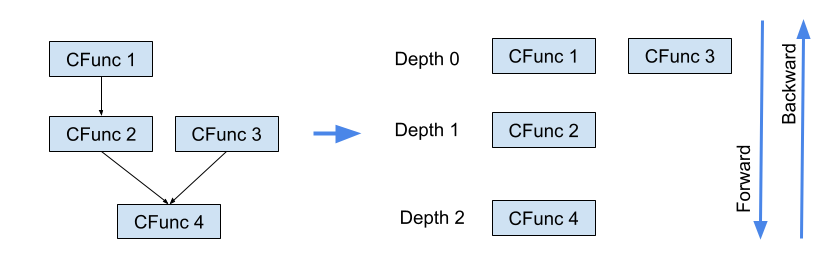
Computation graph ordered by depth for forward and backward passes.
On an NVIDIA GPU the CNet framework clones the CPU net and executes the forward and backward passes in parallel following the graph computation depth. The following image shows how a batch of size 32 is deployed on a GPU:
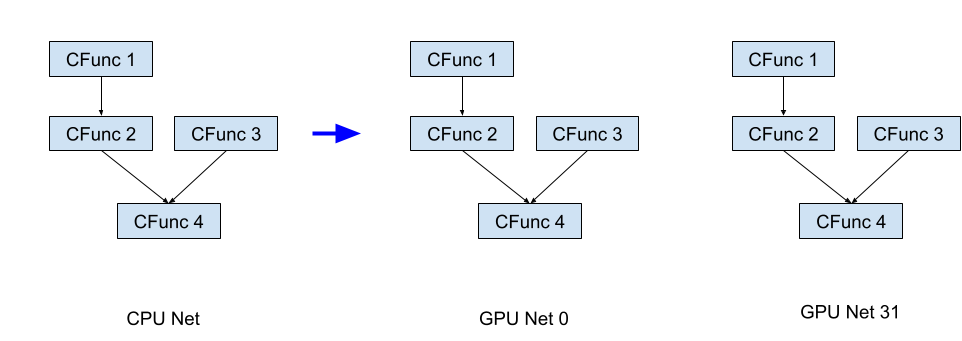
A batch of size 32 deployed across GPU clones of the network.
Complex Layers
Input Layer
The Input Layer is used as the main input for the neural network as well as the input parameters
for other layers, e.g., Linear or Hadamard layers. In the following snippet inp is the
main input and h_data is the parameter for the Hadamard function.
#include "impl/cinput.h"

CNet cnet;
auto inp = cnet.add(new CInput(OutSize(28 * 28)));
auto h_data = cnet.add(new CInput(OutSize(28 * 28)));
auto hdm = cnet.add(new Hadamard(InSize(28 * 28), InSize(28 * 28)), {inp, h_data});
The main variable is the output size, e.g., CInput(OutSize(1024)).
As the main input, on CPU you can set complex values from a batch via:
setInput(InputBatch& batch, int b_indx)
As an input parameter for other layers, its values are either randomly initialized
via net.init_inputs() or restored from a model via
net.restore(std::string file).
Embedding Layer
The Embedding Layer is used only as the main input for the neural network.
Its main variables are the embedding dimension, the number of embeddings, and the maximum
number of input tokens. The following snippet creates an embedding of
no_embeddings = 100 tokens of dimension emb_dim = 300 with
a maximum of max_in_tokens = 64 tokens and output of
emb_dim * max_in_tokens = 300 * 64 complex numbers (padded with zeros if necessary):
#include "impl/embed.h"

int emb_dim = 300;
int max_in_tokens = 64;
int no_embedings = 100;
CNet cnet;
auto emb = cnet.add(new CEmbedding(emb_dim, max_in_tokens, no_embedings));
auto fft = cnet.add(new FourierTrans(InSize(emb_dim * max_in_tokens)), {emb});
On CPU you can set the output embedding values using a vector<int>:
embedding.setInput({2, 1, 1, 3});On GPU use:
net.batchToGpu(InputFunc *inp, OutputFunc *outp, Batch *batch);Fourier Transform Layer
This layer implements the Discrete Fourier Transform:
#include "impl/ft.h"

CNet cnet;
auto inp = cnet.add(new CInput(OutSize(28 * 28)));
auto fft = cnet.add(new FourierTrans(InSize(28 * 28)), {inp});
Hadamard Layer
This layer implements element-wise multiplication:
In the CVNN world, the Hadamard Layer is equivalent to the Convolution layer, because the Fourier Transform commutes with convolution: FFT(Conv(u, v)) = Hadamard(FFT(u), FFT(v)). See also On the Equivalence of Convolutional and Hadamard Networks using DFT.
#include "impl/hadamard.h"

CNet cnet;
auto inp = cnet.add(new CInput(OutSize(28 * 28)));
auto fft = cnet.add(new FourierTrans(InSize(28 * 28)), {inp});

auto h_data = cnet.add(new CInput(OutSize(28 * 28)));
auto hdm = cnet.add(new Hadamard(InSize(28 * 28), InSize(28 * 28)), {fft, h_data});
Residual Layer
This layer implements element-wise addition:
#include "impl/residual.h"

CNet cnet;
// ...
auto fft = cnet.add(new FourierTrans(InSize(28 * 28)), {inp});
// ...
auto hdm = cnet.add(new Hadamard(InSize(28 * 28), InSize(28 * 28)), {fft, h_data});

auto res = cnet.add(new Residual(InSize(28 * 28), InSize(28 * 28)), {fft, hdm});
Linear Layer
The equivalent of the fully connected / dense layer, performing matrix multiplication:
#include "impl/linear.h"

CNet cnet;
// ...
auto l_data = cnet.add(new CInput(OutSize(512 * 10)));
auto lin = cnet.add(new Linear(InSize(512), InSize(512 * 10)), {gelu, l_data});
auto outp = cnet.add(new CrossEntropy(InSize(10)), {lin});
CRelu Layer
The complex equivalent of ReLU:
#include "impl/relu.h"

CNet cnet;
// ...
auto inp = cnet.add(new CInput(OutSize(512)));
auto rel = cnet.add(new Crelu(InSize(512)), {inp});
Gelu Layer
The complex equivalent of GeLU. Read more in the paper Gaussian Error Linear Units (GELUs):
#include "impl/relu.h"

CNet cnet;
// ...
auto inp = cnet.add(new CInput(OutSize(512)));
auto rel = cnet.add(new CGelu(InSize(512)), {inp});
L2Out Loss Function
The square of the L2 norm:
#include "impl/l2out.h"

CNet net;
auto inp = net.add(new CInput(OutSize(128)));
auto sigm = net.add(new CSigmoid(InSize(128)), {inp});
auto l2 = net.add(new L2Out(InSize(128)), {sigm});
Cross Entropy Loss Function
The CrossEntropy loss. Read more in the paper On the Equivalence of Convolutional and Hadamard Networks using DFT:
#include "impl/crossent.h"

CNet cnet;
// ...
auto l_data = cnet.add(new CInput(OutSize(28 * 28 * 10)));
auto lin = cnet.add(new Linear(InSize(28 * 28), InSize(28 * 28 * 10)), {gelu, l_data});
auto ce = cnet.add(new CrossEntropy(InSize(10)), {lin});
Building the Software
CNet is currently supported only on Linux/macOS and can be built using make.
The Makefile checks for the presence of the NVIDIA CUDA Compiler (nvcc).
If found, it compiles with CUDA support; otherwise it falls back to g++.
git clone https://github.com/crasmarum/CNet.git
cd CNet
make
Training on GPU
If nvcc is found, the Makefile automatically compiles CNet with CUDA support.
Once you have downloaded the MNIST/Fashion MNIST datasets, you can train the example network:
~/cnet -mnist_images ~/train-images.idx3-ubyte -mnist_labels ~/train-labels.idx1-ubyte \
       -model_path ~/test.mod  -mnist_gpu_train true
You can change the default learning rate and GPU batch size via l_rate and batch_size:
~/cnet -mnist_images ~/train-images.idx3-ubyte -mnist_labels ~/train-labels.idx1-ubyte \
       -model_path ~/test.mod  -mnist_gpu_train true -l_rate 0.001 -batch_size 40
The core training loop:
MnistDataReader reader;
assert(reader.Open(mnist_images, mnist_labels, 60000));
assert(reader.readData());

CNet cnet;
assert(cnet.hasGPU());
int cinp, coutp;
createMnistNet(cnet, &cinp, &coutp);
std::cout << cnet.cpuNet().toString() << std::endl;

CInput *inp = (CInput*)cnet[cinp];
CrossEntropy *cen = (CrossEntropy*)cnet[coutp];
cnet.init_inputs();

assert(cnet.allocateOnGpu(batch_size));
std::cout << std::setprecision(4) << "L_rate: " << l_rate
          << "\t batch_size: " << batch_size << std::endl;

float avg_loss = 0;
for (int epoch = 0; epoch < no_epochs; ++epoch) {
    reader.shuffle();
    for (int time = 0; time < reader.size() / batch_size; ++time) {
        auto batch = reader.nextBatch(batch_size);

        cnet.gpuForward(inp, cen, batch);
        avg_loss += cnet.getLoss(cen, &batch);

        if (time % 100 == 99) {
            std::cout << epoch << "\t" << time << "\t loss: " << (avg_loss / 100) << std::endl;
            avg_loss = 0;
        }

        if (time % 1000 == 999) {
            if (!cnet.getInputsFromGpu()) {
                std::cerr << "Warning: could get data from GPU." << std::endl;
            } else {
                cnet.save(model_path);
                std::cout << "Model saved at: " << model_path << std::endl;
            }
        }

        cnet.gpuBackward();
        cnet.gpuUpdateInputs(l_rate / batch.size());
    }
}
Caveat
The current version of the CNet framework has some limitations:
- There is no support for multiple GPUs at the moment.
- APIs to create new functions / layers are for CPU-only. Support for CUDA layer APIs to follow.
- Certain CUDA layer implementations are not optimal.
- Supported only on Linux/macOS.